 Dify 模型部署教程
一、Dify简介
Dify 是一款开源的大语言模型(LLM) 应用开发平台。它融合了后端即服务(Backend as Service)和 LLMOps 的理念,使开发者可以快速搭建生产级的生成式 AI 应用。即使你是非技术人员,也能参与到 AI 应用的定义和数据运营过程中。
由于 Dify 内置了构建 LLM 应用所需的关键技术栈,包括对数百个模型的支持、直观的 Prompt 编排界面、高质量的 RAG 引擎、稳健的 Agent 框架、灵活的流程编排,并同时提供了一套易用的界面和 API。这为开发者节省了许多重复造轮子的时间,使其可以专注在创新和业务需求上。
你或许可以把 LangChain 这类的开发库(Library)想象为有着锤子、钉子的工具箱。与之相比,Dify 提供了更接近生产需要的完整方案,Dify 好比是一套脚手架,并且经过了精良的工程设计和软件测试。重要的是,Dify 是开源的,它由一个专业的全职团队和社区共同打造。你可以基于任何模型自部署类似 Assistants API 和 GPTs 的能力,在灵活和安全的基础上,同时保持对数据的完全控制。
Dify能做什么?
- 创业 ,快速的将你的 AI 应用创意变成现实,无论成功和失败都需要加速。在真实世界,已经有几十个团队通过 Dify 构建 MVP(最小可用产品)获得投资,或通过 POC(概念验证)赢得了客户的订单。
- 将 LLM 集成至已有业务 ,通过引入 LLM 增强现有应用的能力,接入 Dify 的 RESTful API 从而实现 Prompt 与业务代码的解耦,在 Dify 的管理界面是跟踪数据、成本和用量,持续改进应用效果。
- 作为企业级 LLM 基础设施 ,一些银行和大型互联网公司正在将 Dify 部署为企业内的 LLM 网关,加速 GenAI 技术在企业内的推广,并实现中心化的监管。
- 探索 LLM 的能力边界 ,即使你是一个技术爱好者,通过 Dify 也可以轻松的实践 Prompt 工程和 Agent 技术,在 GPTs 推出以前就已经有超过 60,000 开发者在 Dify 上创建了自己的第一个应用。
二、本地部署(非Docker)
| 环境 | 版本号 |
|---|---|
| Python | =3.12 |
| PostgreSQL | =14.17 |
| RabbitMQ | =3.9.27 |
| Ubtuntu | 22.4.0 |
1.安装PostgreSQL
1.1 .更新软件包列表
sudo apt update
1.2.安装 PostgreSQL
- 默认版本安装 (推荐):
sudo apt install postgresql postgresql-client postgresql-contrib
- 安装特定版本 (如 PostgreSQL 16):
- 添加官方源:
curl -fSsL https://www.postgresql.org/media/keys/ACCC4CF8.asc | gpg --dearmor | sudo tee /usr/share/keyrings/postgresql.gpg > /dev/null echo "deb [arch=amd64,arm64,ppc64el signed-by=/usr/share/keyrings/postgresql.gpg] http://apt.postgresql.org/pub/repos/apt/ $(lsb_release -cs)-pgdg main" | sudo tee /etc/apt/sources.list.d/postgresql.list sudo apt update - 安装指定版本:
sudo apt install postgresql-16 postgresql-client-16
- 添加官方源:
1.3.验证安装
psql --version
# 示例输出:psql (PostgreSQL) 15.3(具体版本取决于安装)
1.4.启动
sudo service postgresql start
1.5.配置与使用
- 切换到
postgres用户 :
sudo -i -u postgres
- 进入 PostgreSQL 交互终端
psql
- 创建数据库(记住数据库名字)
CREATE DATABASE dify;
- 设置用户密码(记住密码)
# 1. 使用 psql 工具以超级用户身份登录数据库
sudo -u postgres psql

# 2. 执行 SQL 命令设置密码
ALTER USER postgres WITH PASSWORD 'dify';

# 3. 退出 psql
\q
2.连接向量数据库
2.1.安装环境
sudo apt-get update
#安装开发文件
sudo apt install --reinstall postgresql-server-dev-14
#安装编译环境
sudo apt install -y build-essential gcc make wget
# 安装向量计算优化库(可选但推荐)
sudo apt install -y libopenblas-dev
2.2下载并编译 PGVector
# 下载最新版PGVector (访问 https://github.com/pgvector/pgvector/releases 获取最新版本)
wget https://github.com/pgvector/pgvector/archive/refs/tags/v0.6.1.tar.gz
tar -xvf v0.6.1.tar.gz
cd pgvector-0.6.1

# 编译安装
make
sudo make install
2.3.在 PostgreSQL 中启用扩展
#进入dify数据库
psql -h 127.0.0.1 -p 5432 -U postgres -d dify
#密码
dify

# 在命令行中创建扩展
CREATE EXTENSION vector;
exit;
2.4.修改配置文件
cd /
#修改配置文件
vim /dify/api/.env

VECTOR_STORE=pgvector

PGVECTOR_HOST=localhost
PGVECTOR_PORT=5432
PGVECTOR_USER=postgres
PGVECTOR_PASSWORD=dify
PGVECTOR_DATABASE=dify
PGVECTOR_MIN_CONNECTION=1
PGVECTOR_MAX_CONNECTION=5
退出配置文件命令:
注意要在英文键盘下进行
先按esc件,然后按住shift+:健,然后输入wq!
3、安装Redis
3.1 更新软件列表
sudo apt update
sudo apt upgrade
3.2 使用 apt 安装 Redis
sudo apt install redis-server
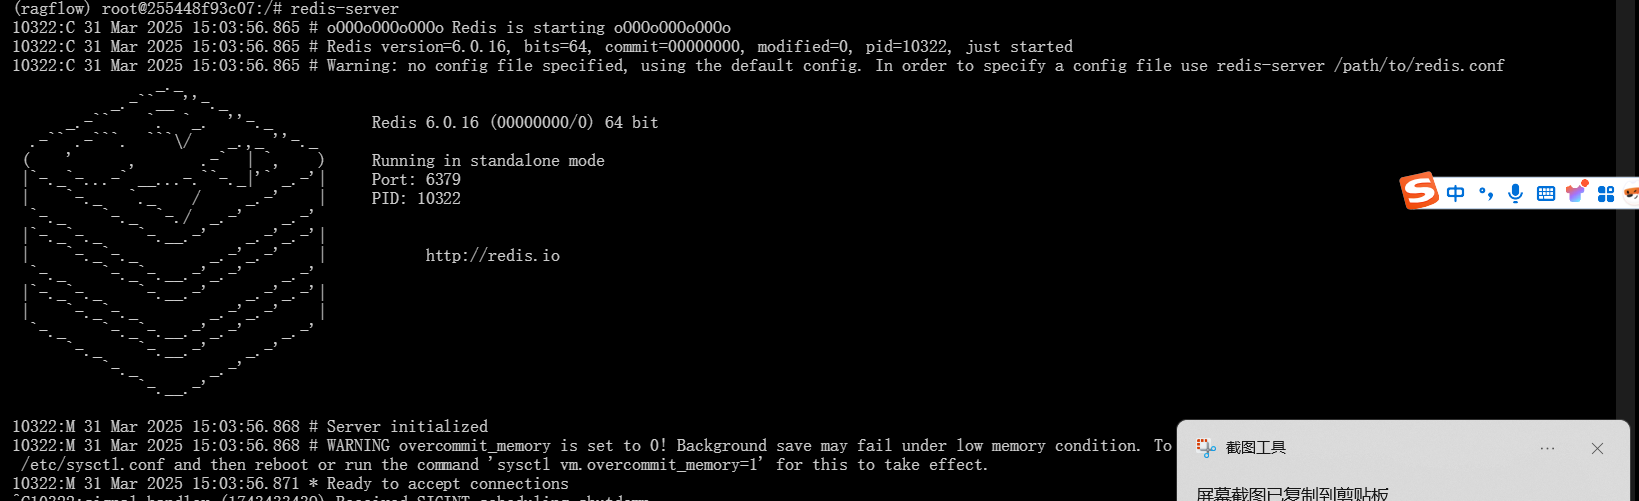
3.3 启动 Redis
redis-server
出现下面的内容即为启动成功
3.4 测试 Redis 是否正常工作
redis-cli --version
4.安装RabbitMQ
4.1.安装Erlang
由于 RabbitMQ需要Erlang语言支持,所以需要安装 Erlang。
#安装Erlang
apt-get install erlang
#验证安装
erl
Erlang安装成功:

此时进入 Eshell 退出命令:Ctrl + c 一致按到退出为止
4.2.安装RabbitMQ
#更新安装包
sudo apt-get update
#安装最新版本
sudo apt-get install rabbitmq-server
#验证
rabbitmqctl version
4.3.启动RabbitMQ
sudo service rabbitmq-server start
5.Dify本地部署
5.1.Clone Dify 代码(或者从GitHub中本地下载):
git clone https://github.com/langgenius/dify.git
5.2.安装基础环境
- 安装pyenv
#更新包列表
sudo apt update
#安装curl
sudo apt install curl
#安装pyenv
curl -fsSL https://pyenv.run | bash
#安装Python构建依赖库
sudo apt update; sudo apt install build-essential libssl-dev zlib1g-dev \
libbz2-dev libreadline-dev libsqlite3-dev curl git \
libncursesw5-dev xz-utils tk-dev libxml2-dev libxmlsec1-dev libffi-dev liblzma-dev
#安装Python3.12.0
pyenv install 3.12
#切换到“3.12”Python环境
pyenv global 3.12
- 安装UV
curl -LsSf https://astral.sh/uv/install.sh | sh
- 安装libmagic
sudo apt-get install libmagic1
5.3安装Dify Plugin Daemon
Dify Plugin Daemon 是一项管理插件生命周期的服务。它负责 3 种类型的运行时:
- 本地运行时:与 Dify 服务器运行在同一台计算机上。
- Debug runtime:监听一个端口,等待调试插件连接。
- 无服务器运行时:在 AWS Lambda 等无服务器平台上运行。
-
安装go语言
在安装Dify Plugin Daemon之前需要先安装go语言#先安装software-properties-common sudo apt install -y software-properties-common #添加Golang 官方 PPA sudo add-apt-repository ppa:longsleep/golang-backports # 更新软件源索引 sudo apt update # 安装最新版 Go sudo apt install -y golang-go -
下载Dify Plugin Daemon
网址:https://github.com/langgenius/dify-plugin-daemon
使用git下载或者直接从上面的网址本地下载(我是放在了dify项目文件下)
git clone https://github.com/langgenius/dify-plugin-daemon.git
- 安装Dify Plugin Daemo
#进入目录中
cd /dify/dify-plugin-daemon/.script
#安装dify-plugin-daemon
bash ./install.sh
- 安装依赖
#进入目录
cd /dify/dify-plugin-daemon
#安装依赖
go mod download
# 清理冗余
go mod tidy
# 编译(在当前目录下进入cmd/server)
cd cmd/server
go build
- 启动Dify Plugin Daemo(在/dify/dify-plugin-daemon这个目录下运行)
go run cmd/server/main.go
5.4启动API服务
- 进入 API 目录
cd /dify/api
- 复制环境变量配置文件
cp .env.example .env
- 生成随机密钥,并替换 中 的值
.env``SECRET_KEY
awk -v key="$(openssl rand -base64 42)" '/^SECRET_KEY=/ {sub(/=.*/, "=" key)} 1' .env > temp_env && mv temp_env .env
- 安装依赖包
Dify API 服务使用 Poetry 来管理依赖。
poetry env use 3.12
poetry install
- 执行数据库迁移
将数据库结构迁移至最新版本。
poetry run flask db upgrade
- 更改后端配置
按照下面的配置文档更改自己的配置
路径:/dify/api/.env
vim /dify/api/.env

- 启动 API 服务
注意在启动这个的时候需要启动PostgreSQL、Redis、RabbitMQ这三个服务
poetry run flask run --host 0.0.0.0 --port=5001 --debug
正确输出:
* Debug mode: on
INFO:werkzeug:WARNING: This is a development server. Do not use it in a production deployment. Use a production WSGI server instead.
 * Running on all addresses (0.0.0.0)
 * Running on http://127.0.0.1:5001
INFO:werkzeug:Press CTRL+C to quit
INFO:werkzeug: * Restarting with stat
WARNING:werkzeug: * Debugger is active!
INFO:werkzeug: * Debugger PIN: 695-801-919
- 启动 Worker 服务
注意在启动这个的时候需要启动PostgreSQL、Redis、RabbitMQ这三个服务
用于消费异步队列任务,如知识库文件导入、更新知识库文档等异步操作。Linux / MacOS 启动:
poetry run celery -A app.celery worker -P gevent -c 1 -Q dataset,generation,mail,ops_trace --loglevel INFO
如果使用 Windows 系统启动,请替换为该命令:
poetry run celery -A app.celery worker -P solo --without-gossip --without-mingle -Q data
正确输出:
 -------------- celery@TAKATOST.lan v5.2.7 (dawn-chorus)
--- ***** -----
-- ******* ---- macOS-10.16-x86_64-i386-64bit 2023-07-31 12:58:08
- *** --- * ---
- ** ---------- [config]
- ** ---------- .> app:         app:0x7fb568572a10
- ** ---------- .> transport:   redis://:**@localhost:6379/1
- ** ---------- .> results:     postgresql://postgres:**@localhost:5432/dify
- *** --- * --- .> concurrency: 1 (gevent)
-- ******* ---- .> task events: OFF (enable -E to monitor tasks in this worker)
--- ***** -----
 -------------- [queues]
                .> dataset          exchange=dataset(direct) key=dataset
                .> generation       exchange=generation(direct) key=generation
                .> mail             exchange=mail(direct) key=mail

[tasks]
  . tasks.add_document_to_index_task.add_document_to_index_task
  . tasks.clean_dataset_task.clean_dataset_task
  . tasks.clean_document_task.clean_document_task
  . tasks.clean_notion_document_task.clean_notion_document_task
  . tasks.create_segment_to_index_task.create_segment_to_index_task
  . tasks.deal_dataset_vector_index_task.deal_dataset_vector_index_task
  . tasks.document_indexing_sync_task.document_indexing_sync_task
  . tasks.document_indexing_task.document_indexing_task
  . tasks.document_indexing_update_task.document_indexing_update_task
  . tasks.enable_segment_to_index_task.enable_segment_to_index_task
  . tasks.generate_conversation_summary_task.generate_conversation_summary_task
  . tasks.mail_invite_member_task.send_invite_member_mail_task
  . tasks.remove_document_from_index_task.remove_document_from_index_task
  . tasks.remove_segment_from_index_task.remove_segment_from_index_task
  . tasks.update_segment_index_task.update_segment_index_task
  . tasks.update_segment_keyword_index_task.update_segment_keyword_index_task

[2023-07-31 12:58:08,831: INFO/MainProcess] Connected to redis://:**@localhost:6379/1
[2023-07-31 12:58:08,840: INFO/MainProcess] mingle: searching for neighbors
[2023-07-31 12:58:09,873: INFO/MainProcess] mingle: all alone
[2023-07-31 12:58:09,886: INFO/MainProcess] pidbox: Connected to redis://:**@localhost:6379/1.
[2023-07-31 12:58:09,890: INFO/MainProcess] celery@TAKATOST.lan ready.
5.5前端页面部署
- 安装基础环境
安装 NodeJS + NPM
# Download and install nvm:
curl -o- https://raw.githubusercontent.com/nvm-sh/nvm/v0.40.2/install.sh | bash
# in lieu of restarting the shell
\. "$HOME/.nvm/nvm.sh"
# Download and install Node.js:
nvm install 22
# Verify the Node.js version:
node -v # Should print "v22.14.0".
nvm current # Should print "v22.14.0".
# Verify npm version:
npm -v # Should print "10.9.2".
- 进入web目录
cd /dify/web
- 安装依赖包
npm i -g pnpm
pnpm install
- 配置环境变量
- 构建代码
pnpm run build
- 启动web服务
注意在启动web服务前,后端API以及前面的所有服务都需要启动
npm run start
# or
yarn start
# or
pnpm start
正常启动后,终端会输出如下信息:
ready - started server on 0.0.0.0:3000, url: http://localhost:3000
warn  - You have enabled experimental feature (appDir) in next.config.js.
warn  - Experimental features are not covered by semver, and may cause unexpected or broken application behavior. Use at your own risk.
info  - Thank you for testing `appDir` please leave your feedback at https://nextjs.link/app-feedback
结果:

点击此处,立即体验Dify!

CSDN号

官方抖音号

B站官方号

官方公众号

官方客服号

